
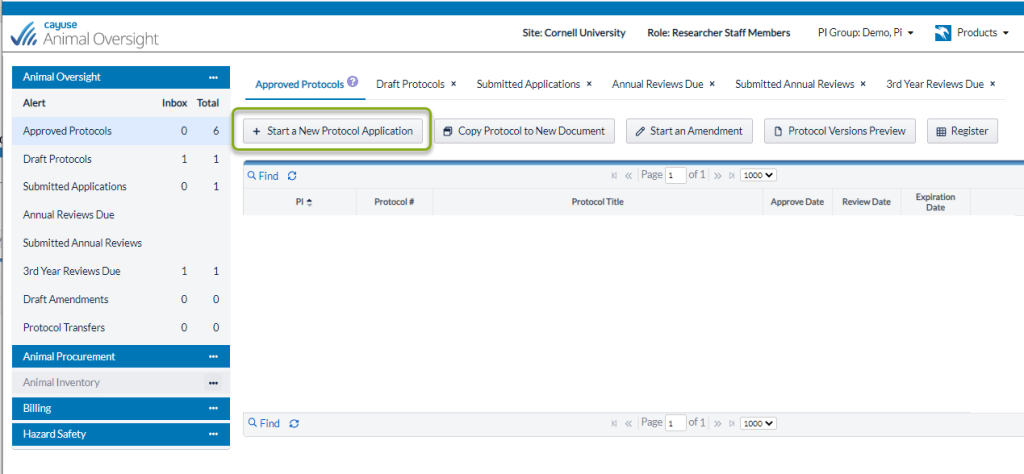
From the left IACUC menu, click on Approved Protocols. Then click Start a New Protocol Application.
Most of the information asked should be familiar to you. The following procedure provides more detail for fields that might need explanation. As you are filling out the protocol, the fields with a red * must be completed in order to submit your protocol for review. If you miss a field, the system will let you know to complete any required fields upon submission.
As you are creating your protocol, you can ask for help from the IACUC team by contacting IACUC@cornell.edu.
Contents
Start Protocol
1. From the left IACUC menu, click on Approved Protocols. Then click Start a New Protocol Application.
2. Answer Yes or No to indicate whether your research will involve vertebrate animals, custom antibodies or collaboration with an outside organization. Then click Start a New Application.
The protocol is now assigned a protocol number and is an official Cornell record. You can return to it at any time and can work on it for as long as you need, but please note: once you start an application, the protocol will now appear in Draft Protocols on the home page, until it is submitted to the IACUC office.
Tip: Use the Table of Contents at the left to quickly jump from section to section of the protocol.
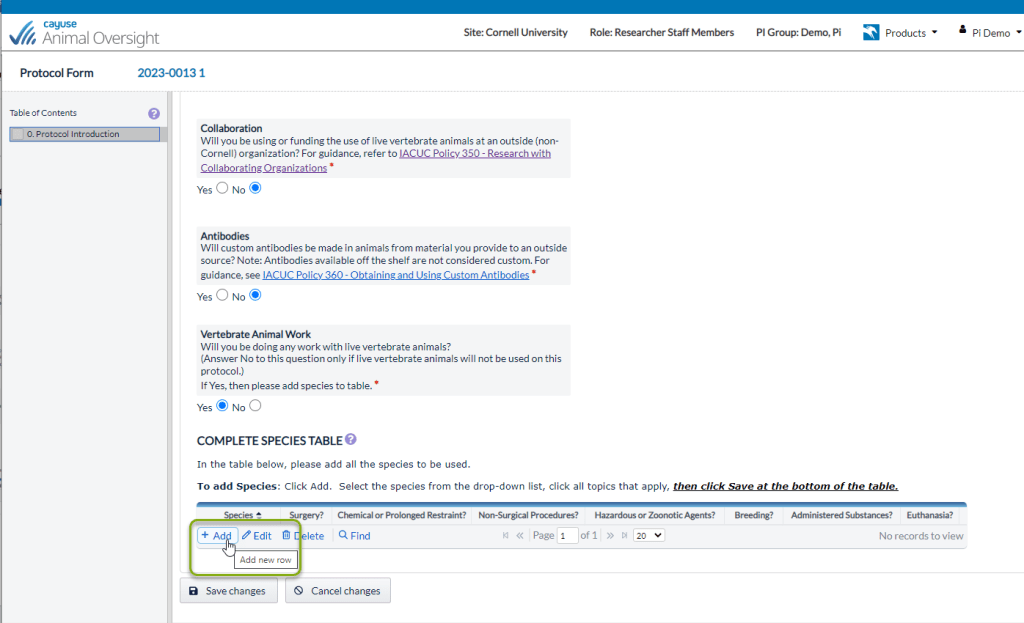
3. The Protocol Introduction page will open first. Complete the questions regarding Collaboration, Antibodies and Vertebrate Animal Work. If you choose YES to the Vertebrate Animal Work question, the Species Table will open so that you can add the species you will be working with.
4. To add a species, click +Add and choose the species from the dropdown menu.
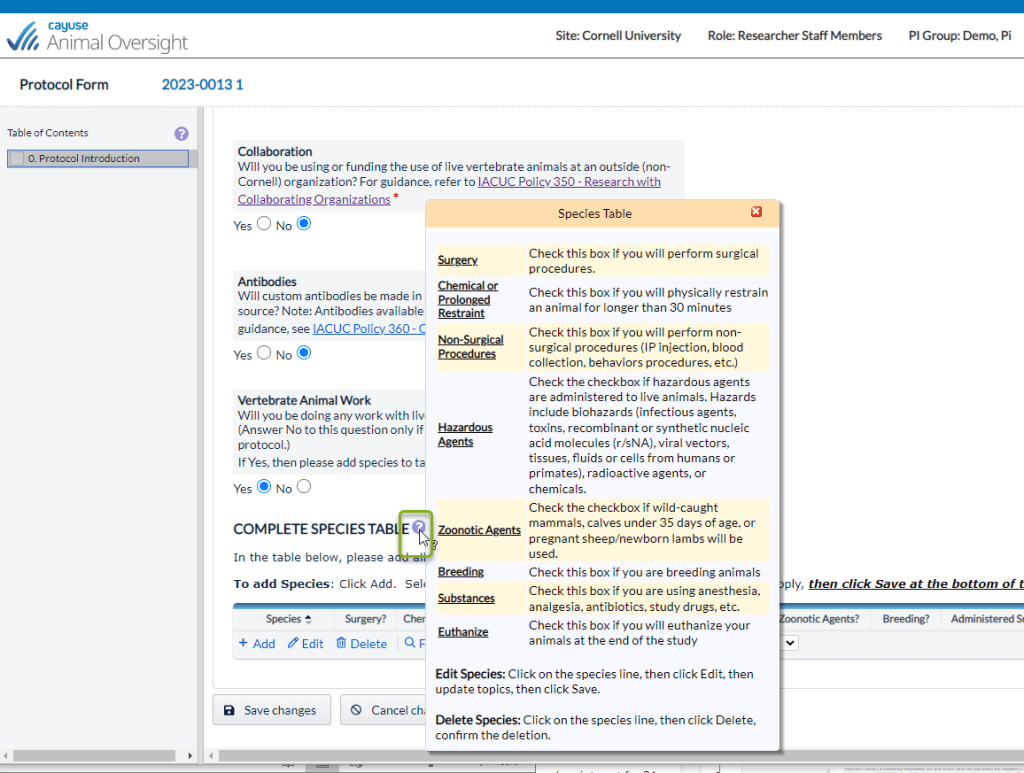
5. Check the boxes indicating what activities will occur in the protocol. Based on which boxes you check, the corresponding pages you will need in your protocol form will open. A description of each check box heading can be found below and by clicking the purple clue tip question mark next to COMPLETE SPECIES TABLE heading.
6. Choose the Save button in the table to save your changes to the table, then choose the Save button at the bottom of the page to save your changes to the page. The corresponding protocol form pages will open in your table of contents on the left side of your screen.
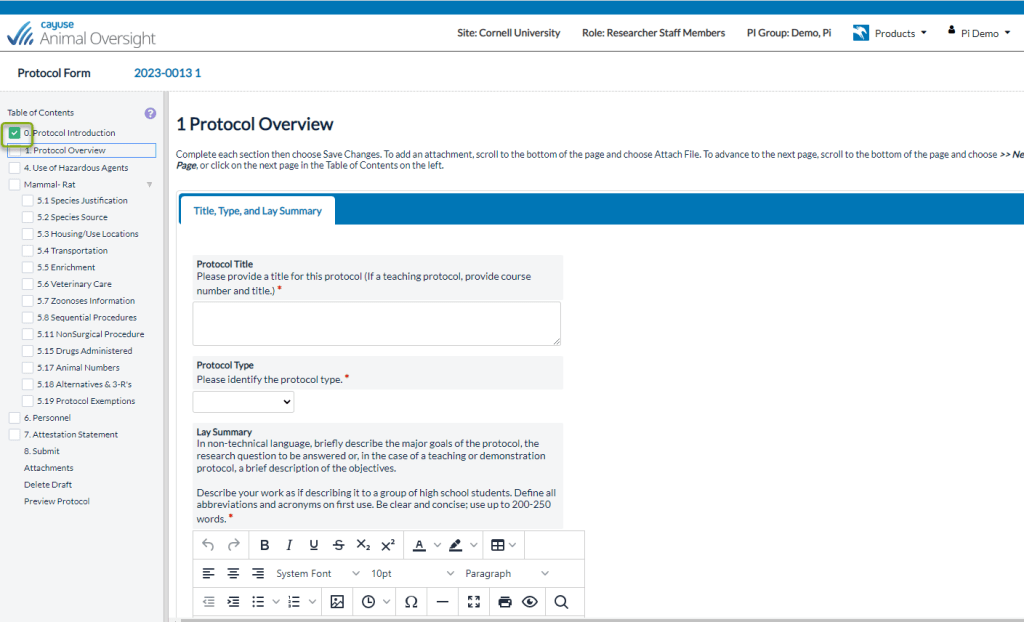
7. Once you have entered all required information and saved the page, a green checkmark displays next to that page title in the Table of Contents.
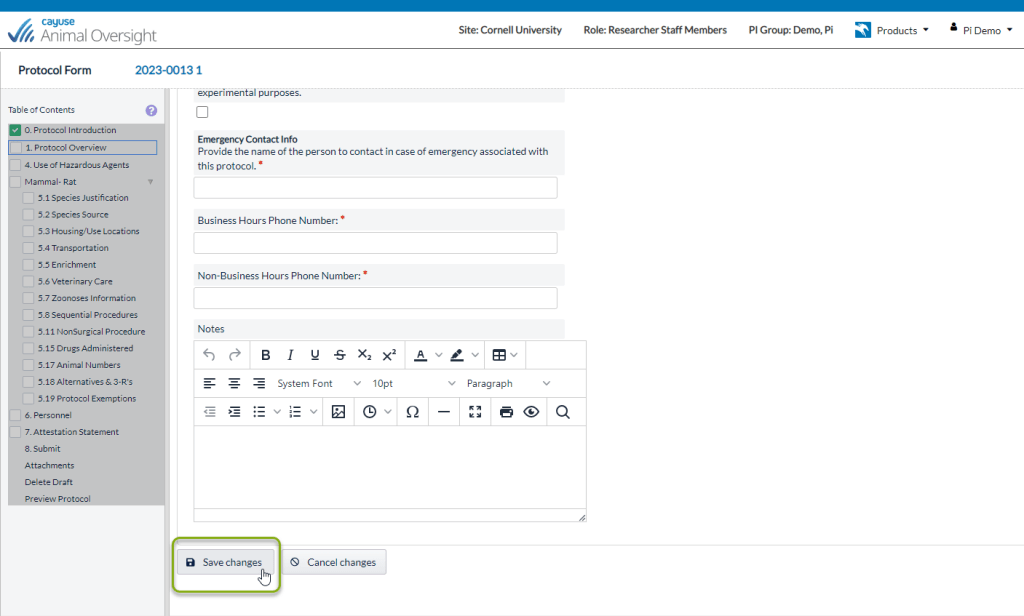
8. Note: anytime the menu on the left has turned grey, it is because you have clicked on a section. This signifies that you are now in edit mode. When the menu on the left is grey, you will need to scroll to the bottom of the page and choose either the Save or Cancel Changes button to get out of edit mode and to be able to move to another section.
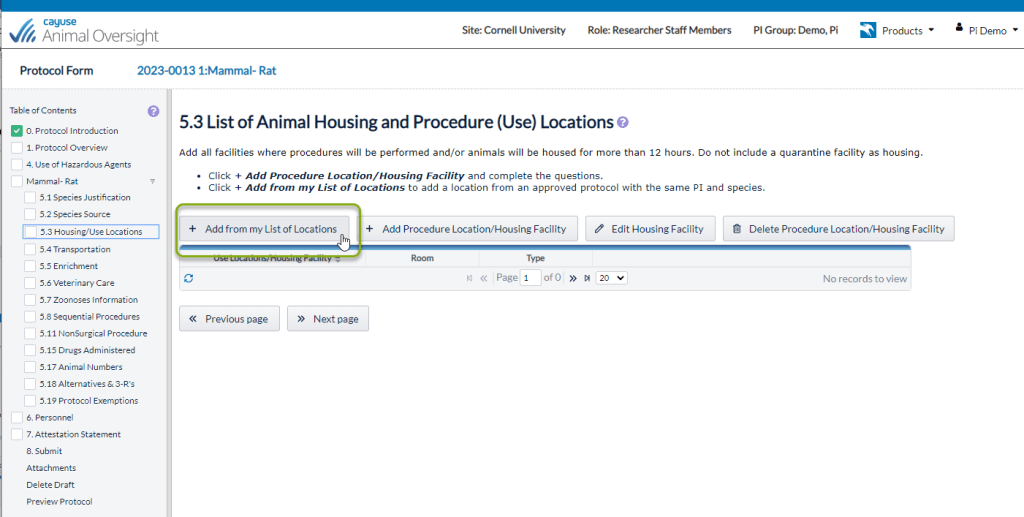
Housing & Use Locations
To add a Housing Facility and/or Procedure Location (areas where procedures are performed), click +Add Procedure Location/Housing Facility and complete all required fields. Then click Save Changes.
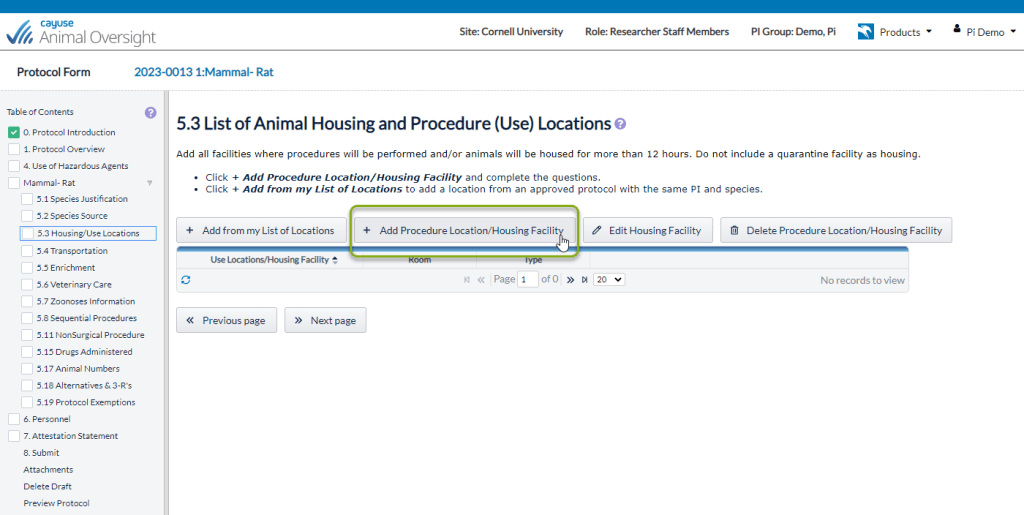
Tip: The button + Add from my List of Locations gives you a listing of all the locations you have existing on another approved IACUC protocol for the same species. By using this shortcut, when applicable, you will not have to re–enter all of the housing/ use information.
Substances Administered to Animals
1. To add a substance, click +Add Substance and WAIT – a long list of substances is being generated!

2. Once the list populates, scroll to find your substance(s), place a checkmark next to each substance you need to add to your protocol. Then click +Add Selected Records at the bottom of the screen. Tip: You can use keyboard shortcuts Command + F on a Mac or Control + F on Windows to use the find feature.
3. Select the substance(s) Z–Other# for any substance not listed.
4. Once the substances are added to the table, you must enter all required fields for each substance. To do this, highlight the first row and click Edit Substance.
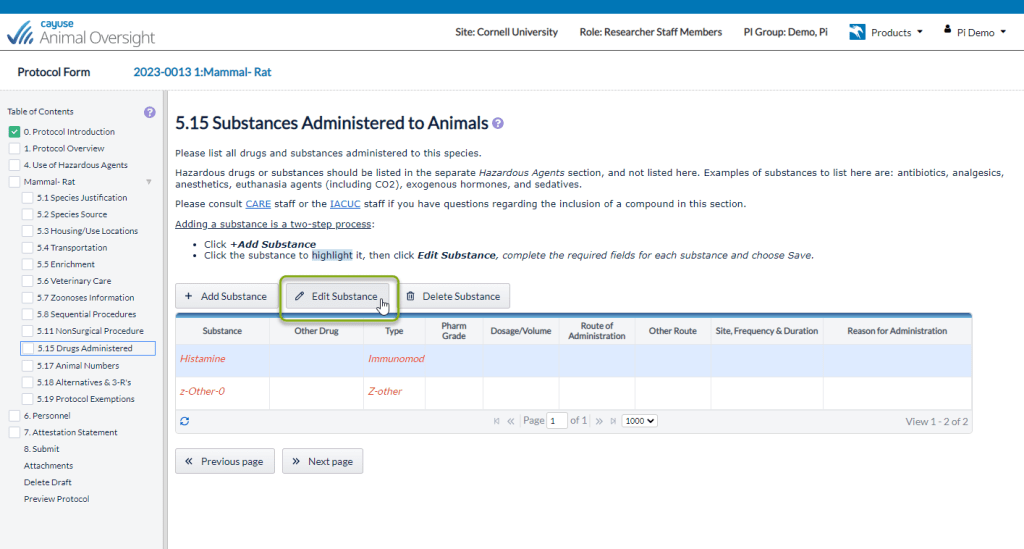
5. Complete all required fields and choose Save Changes. Repeat this step for each substance in the table.
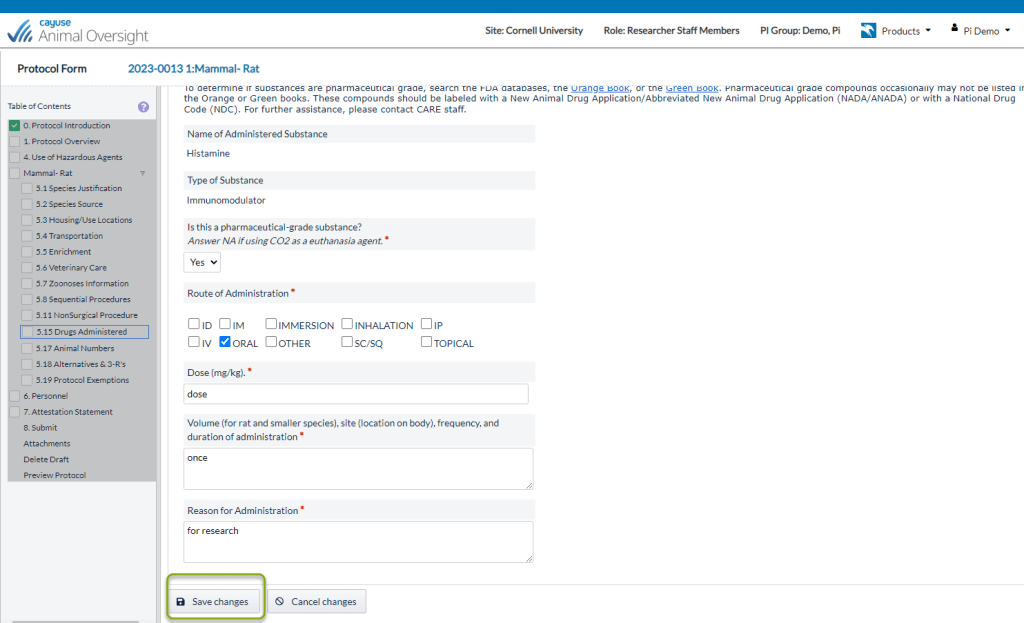
Note: The text for the completed substance will turn from red to black, indicating that it is complete. However, the green checkmark in the Table of Contents next to the Drugs Administered section will not appear until all of the required information has been entered for all substances. Repeat these steps for the remaining substances.
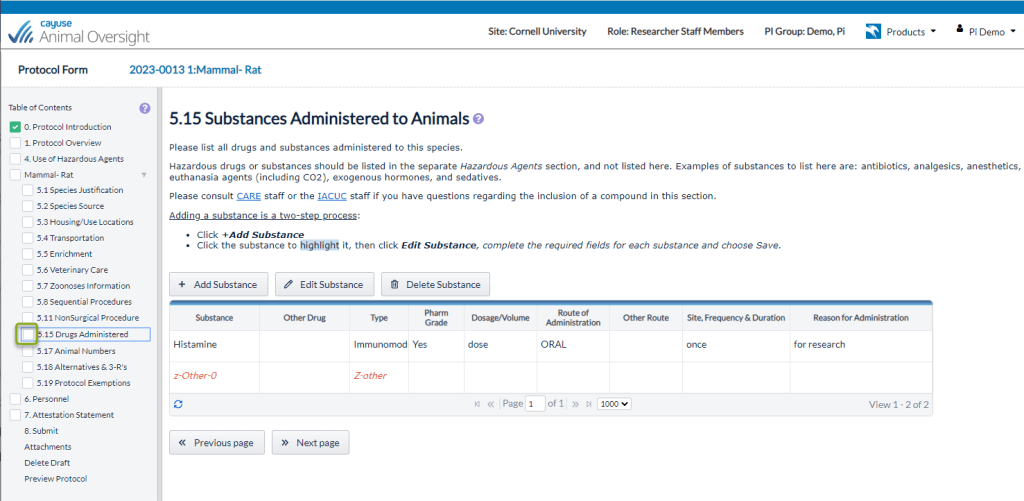
6. When all substances have been entered correctly and saved, the green checkmark will appear.
NOTE: The Hazardous Agents, Restraints, Surgical Procedures, Non–Surgical Procedures, and Euthanasia Methods function similarly to the Administered Substances section.
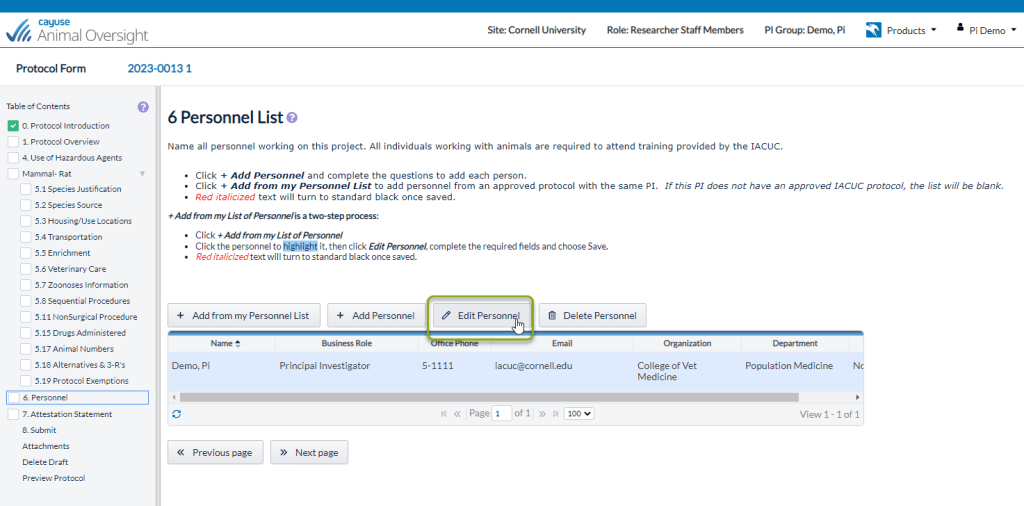
Personnel
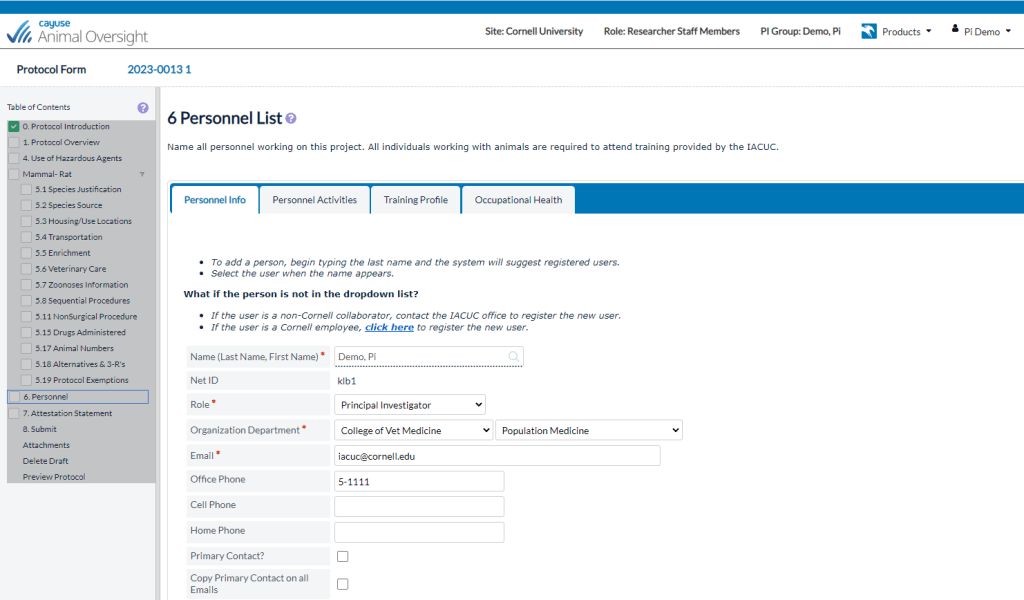
1. The Personnel section will automatically include the PI. Highlight the PI’s name and click the Edit Personnel button.
2. Four tabs will appear at the top of the entry: Personnel Info, Personnel Activities, Training Profile, and Occupational Health. Please do not edit anything under the Occupational Health tab. That is for administrative purposes only.
3. When choosing to Edit Personnel, you will first be placed under the Personnel Info tab. Please complete any blank sections that do not auto populate.
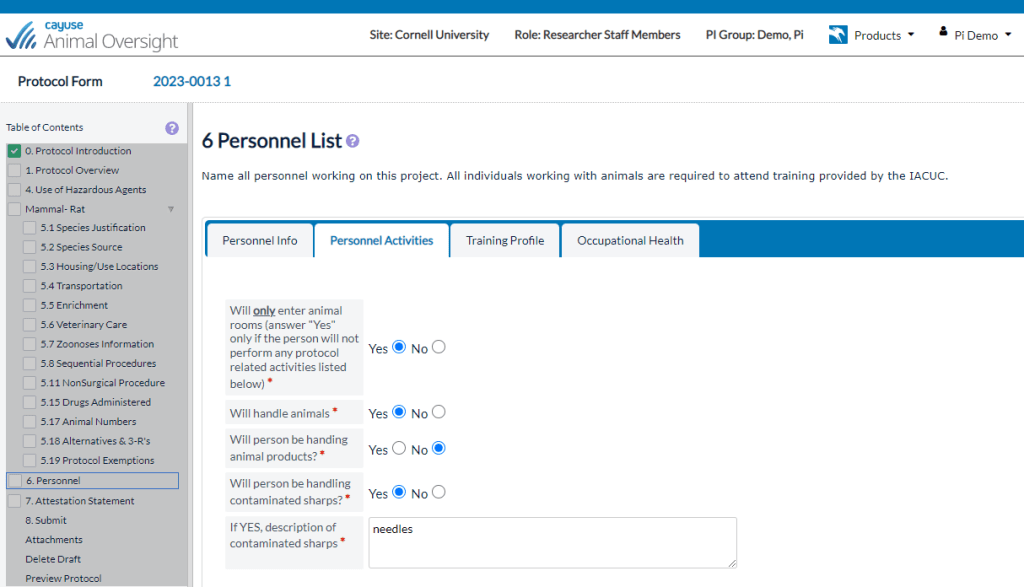
4. Under the Personnel Activities tab, please answer the questions about handling animals. Please note that selecting “yes” may open up additional sections that necessitate an entry. In the example below, answering “yes” to the question about handling contaminated sharps will then prompt you to provide a description of the contaminated sharps.
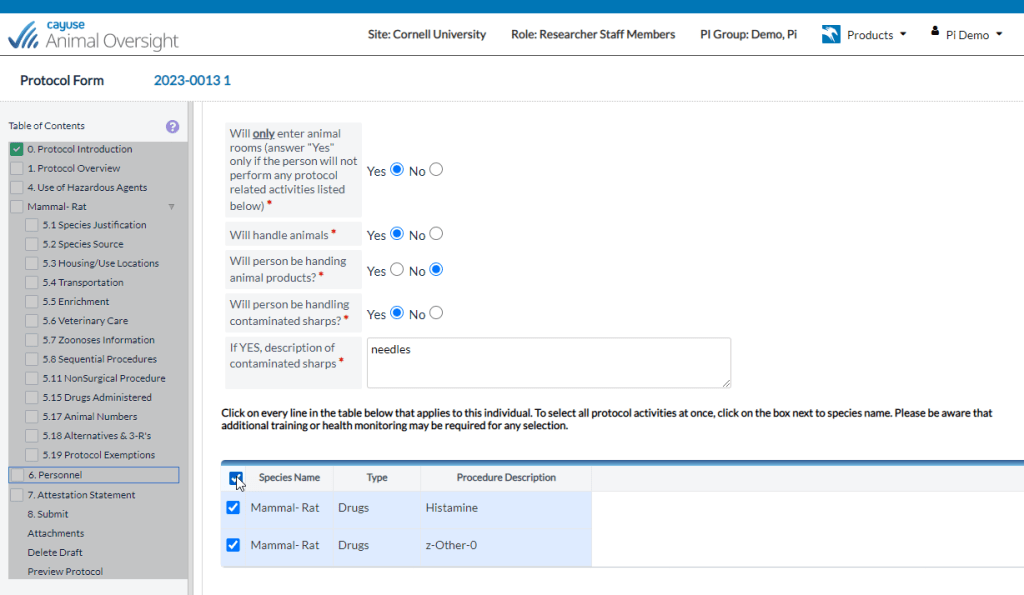
5. Answering “yes” to handling animals will also generate a list of all of the drugs, procedures, surgeries, and euthanasia methods mentioned in the protocol, for each species. Please select from these protocol activities what that participant will perform. Select the top box at the top of the procedure list to select all procedures and substances.
6. Select Save Changes at the bottom of the screen.
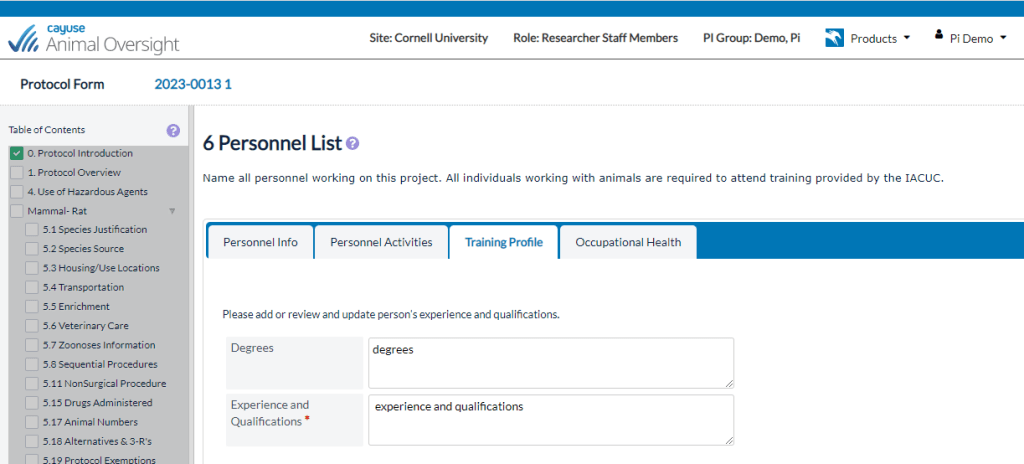
7. Once you have completed the information in the Personnel Activities tab, please move on to the Training Profile tab. Under this tab, please enter the individual’s Degree(s) and their Experience and Qualifications. Under Experience and Qualifications, please include information like the individual’s research experience, the species they’ve worked with, procedures they’ve performed, and/or the amount of time they’ve worked with animals.
8. Select Save Changes at the bottom of the screen. This will take you back to the Personnel list.
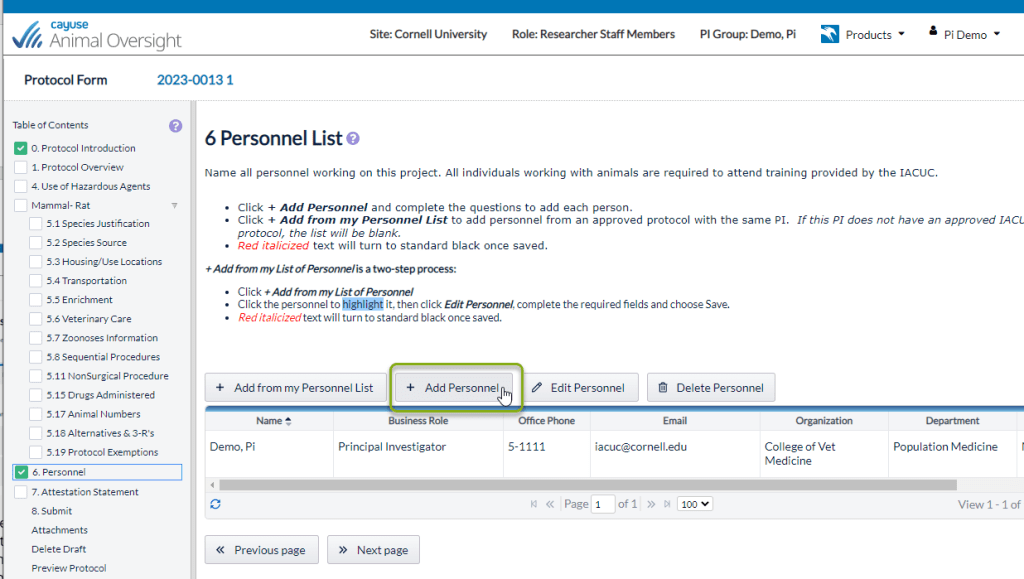
9. To add new personnel to the protocol, you can either choose +Add from my Personnel List or +Add Personnel. As with Housing, if you choose +Add from my Personnel List, this will allow you to add individuals form your other approved protocols of the same species. Choosing +Add Personnel will allow you to add any individual to this protocol, whether they exist on your other approved protocols or not.
10. Once you select +Add Personnel, start typing in the individual’s last name and matches will display in the dropdown selection as you type. Select the correct name from the dropdown selections and you’ll get the following information box.

11. After you press “OK”, the screen will open with the person’s saved information displayed. Fill out all of this individual’s information in the same way as described above.
12. If the individual you are trying to enter does not appear in the dropdown list, but they are a Cornell employee, as instructed at the top of the page, click the colored “click here” link.
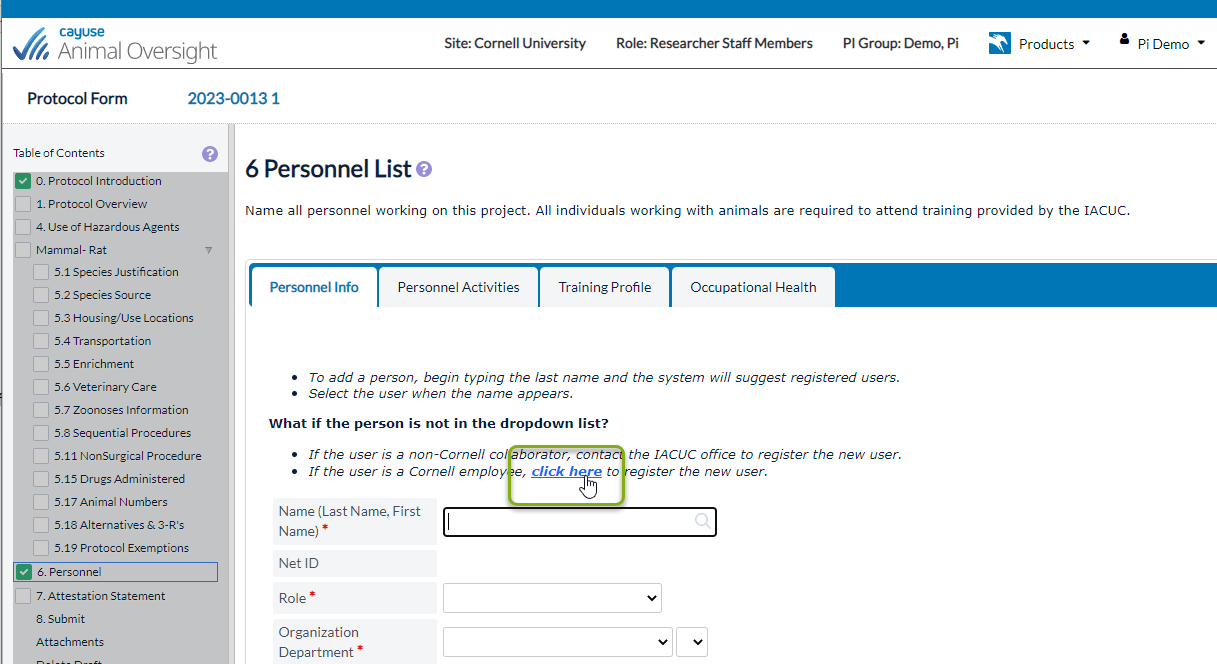
13. Using the Last Name and First Name (if necessary) filters, enter the person’s name. Make sure you are searching via “Contains” and NOT “Equals”. Click Search at the bottom of the screen.
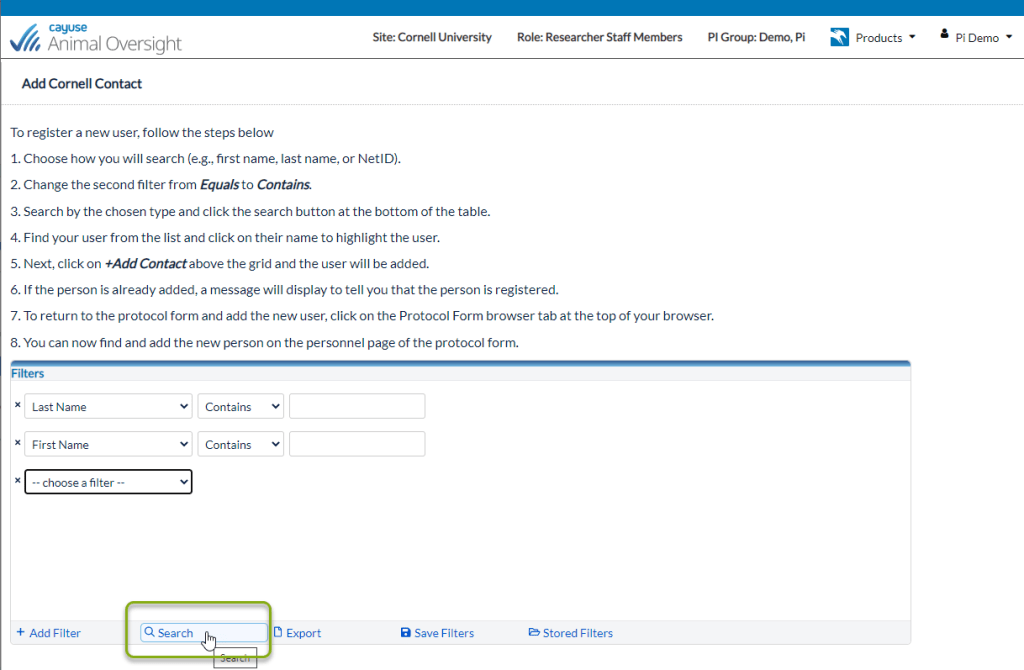
14. A listing of Cornell employees matching the search criteria will be listed. Highlight the correct person, which will turn the row blue, and then select Add Contact. This will add that individual to your Personnel.

15. Close the “Add Cornell Contact” window and now when you search for that individual’s name, it should appear in the dropdown list. Proceed as instructed above.
16. If the user you are trying to add is a non–Cornell collaborator, contact the IACUC office to register the new user. This can be done by emailing IACUC@cornell.edu.
Submitting the Protocol
1. Once all of the content has been entered, every section of your Table of Contents should contain green checkmarks. This means that you are able to submit the protocol by selecting Submit.
2. Note: only the PI has the permission to submit the protocol to the IACUC office for review. If Submit is selected by lab personnel that is not the PI, the PI will receive an email alerting them that the protocol needs to be submitted.
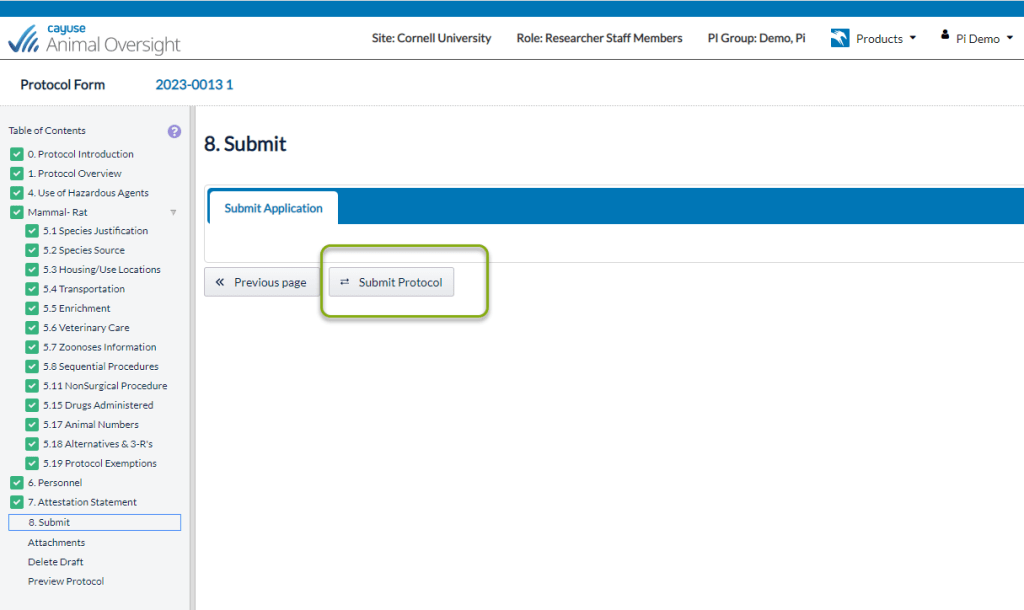
3. Once submitted, the protocol will appear in the Submitted Applications section of your home screen. Researchers will not be able to access their protocol until it is returned to the PI in Cayuse by the IACUC Office.